opencv3.4.2调用训练好的Openpose模型
介绍
opencv除了支持常用的物体检测模型和分类模型之外,还支持openpose模型,同样是线下训练和线上调用。这里不做特别多的介绍,先把源代码和数据放出来~
实验数据
模型文件:pose_iter_440000.caffemodel
.protxt文件:https://github.com/opencv/opencv_extra,下载后,找到dnn文件夹,在内部有很多.protxt文件,都是opencv自带的。
源代码
import cv2 as cv
import numpy as npdataset = 'MPI'
if dataset == 'COCO':BODY_PARTS = { "Nose": 0, "Neck": 1, "RShoulder": 2, "RElbow": 3, "RWrist": 4,"LShoulder": 5, "LElbow": 6, "LWrist": 7, "RHip": 8, "RKnee": 9,"RAnkle": 10, "LHip": 11, "LKnee": 12, "LAnkle": 13, "REye": 14,"LEye": 15, "REar": 16, "LEar": 17, "Background": 18 }POSE_PAIRS = [ ["Neck", "RShoulder"], ["Neck", "LShoulder"], ["RShoulder", "RElbow"],["RElbow", "RWrist"], ["LShoulder", "LElbow"], ["LElbow", "LWrist"],["Neck", "RHip"], ["RHip", "RKnee"], ["RKnee", "RAnkle"], ["Neck", "LHip"],["LHip", "LKnee"], ["LKnee", "LAnkle"], ["Neck", "Nose"], ["Nose", "REye"],["REye", "REar"], ["Nose", "LEye"], ["LEye", "LEar"] ]
else:assert(dataset == 'MPI')BODY_PARTS = { "Head": 0, "Neck": 1, "RShoulder": 2, "RElbow": 3, "RWrist": 4,"LShoulder": 5, "LElbow": 6, "LWrist": 7, "RHip": 8, "RKnee": 9,"RAnkle": 10, "LHip": 11, "LKnee": 12, "LAnkle": 13, "Chest": 14,"Background": 15 }POSE_PAIRS = [ ["Head", "Neck"], ["Neck", "RShoulder"], ["RShoulder", "RElbow"],["RElbow", "RWrist"], ["Neck", "LShoulder"], ["LShoulder", "LElbow"],["LElbow", "LWrist"], ["Neck", "Chest"], ["Chest", "RHip"], ["RHip", "RKnee"],["RKnee", "RAnkle"], ["Chest", "LHip"], ["LHip", "LKnee"], ["LKnee", "LAnkle"] ]inWidth = 368
inHeight = 368
thr = 0.1
protoc = "/home/oliver/下载/opencv_extra-master/testdata/dnn/openpose_pose_coco.prototxt"
model = "/home/oliver/下载/pose_iter_440000.caffemodel"
net = cv.dnn.readNetFromCaffe(protoc, model)cap = cv.VideoCapture(0)
height = cap.get(cv.CAP_PROP_FRAME_HEIGHT)
width = cap.get(cv.CAP_PROP_FRAME_WIDTH)
video_writer = cv.VideoWriter("D:/pose_estimation_demo.mp4", cv.VideoWriter_fourcc('D', 'I', 'V', 'X'), 15, (640, 480), True)
while cv.waitKey(1) < 0:hasFrame, frame = cap.read()if not hasFrame:cv.waitKey()breakframeWidth = frame.shape[1]frameHeight = frame.shape[0]inp = cv.dnn.blobFromImage(frame, 1.0 / 255, (inWidth, inHeight),(0, 0, 0), swapRB=False, crop=False)net.setInput(inp)out = net.forward()print(len(BODY_PARTS), out.shape[0])# assert(len(BODY_PARTS) == out.shape[1])points = []for i in range(len(BODY_PARTS)):# Slice heatmap of corresponging body's part.heatMap = out[0, i, :, :]# Originally, we try to find all the local maximums. To simplify a sample# we just find a global one. However only a single pose at the same time# could be detected this way._, conf, _, point = cv.minMaxLoc(heatMap)x = (frameWidth * point[0]) / out.shape[3]y = (frameHeight * point[1]) / out.shape[2]# Add a point if it's confidence is higher than threshold.points.append((x, y) if conf > thr else None)for pair in POSE_PAIRS:partFrom = pair[0]partTo = pair[1]assert(partFrom in BODY_PARTS)assert(partTo in BODY_PARTS)idFrom = BODY_PARTS[partFrom]idTo = BODY_PARTS[partTo]if points[idFrom] and points[idTo]:x1, y1 = points[idFrom]x2, y2 = points[idTo]cv.line(frame, (np.int32(x1), np.int32(y1)), (np.int32(x2), np.int32(y2)), (0, 255, 0), 3)cv.ellipse(frame, (np.int32(x1), np.int32(y1)), (3, 3), 0, 0, 360, (0, 0, 255), cv.FILLED)cv.ellipse(frame, (np.int32(x2), np.int32(y2)), (3, 3), 0, 0, 360, (0, 0, 255), cv.FILLED)t, _ = net.getPerfProfile()freq = cv.getTickFrequency() / 1000cv.putText(frame, '%.2fms' % (t / freq), (10, 20), cv.FONT_HERSHEY_SIMPLEX, 0.5, (0, 0, 0))# video_writer.write(frame);# cv.imwrite("D:/pose.png", frame)cv.imshow('OpenPose using OpenCV', frame)
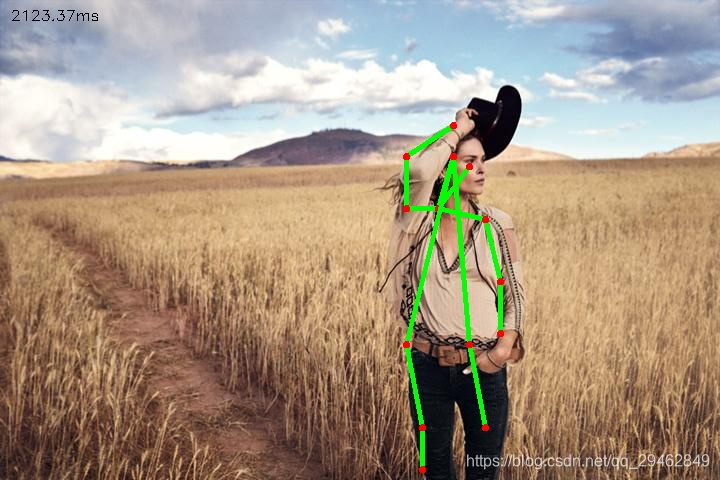
实验结果